Learn how to decorate a large wall and get a high end look with a custom gallery wall.
NEW! For updated photos of this gallery wall, visit my new blog post: Gallery Wall: How to Make a Designer-Inspired Photo Wall.
This post is sponsored by Frame It Easy. As always, all opinions are my own.

TYPES OF PHOTOS TO USE
Making a gallery wall is the perfect solution for a large, blank wall in any room! The beauty of making a gallery wall is that you can use any type of photos you want for a space to make sure it aligns with that room’s purpose. For example, in a family room, entry way, or hallway, it might make sense to use family photos in your gallery wall.

My large, blank wall in need of sprucing up happened to be in my dining room, so I chose to use landscape photos in this space. I picked out various landscape photos Jason and I have taken on past trips. I used photos from our trip to The Biltmore Estate, photos from our honeymoon in Greece, and photos from other various trips we’ve taken over the years.

What I love about the photos I chose is that, while they are landscape photos, they still represent our family and our travels!

HOW TO GET A HIGH END GALLERY WALL
To get a high end look with your gallery wall, it’s a good idea to use custom frames, made specifically to fit in your space.

To get a high end look, I chose:
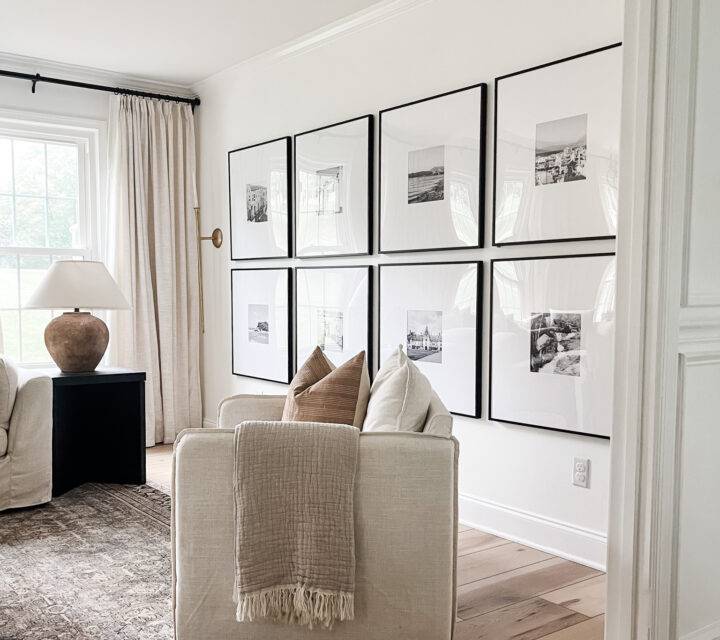
- Square frames with a thin, black border. This gave me a modern and timeless look.
- Large matte size. In my opinion, having a large matte size is key. Finding pre-made square frames with a large matte size is very difficult to do. Even if you do find some, it’s unlikely that the frames will be the right size for your space.
- Huge frames that are all the exact same. All of my eight frames are a little larger than 27×27 (exact specs below). They are really large frames! By using such large frames, I could actually use a smaller number of frames and still take up a large amount of space on the wall. This creates a more upscale look, as opposed to using 50 small frames, for example, that would take up the same amount of space.
- Black and white photos. Using black and white photos in your frames elevates the look of any gallery wall. Plus, those type of photos typically go well with any type of decor in the rest of the space.
- Stacked frames (as opposed to sporadically placed frames). I chose to stack the frames in four rows to create a put-together look.

HOW TO DETERMINE FRAME SIZE
I first figured out exact measurements on my own wall. To do this, I used masking tape as tentative frames. I moved them around quite a bit to see which size would look best. I decided that 27” frames would be best. That would require me to use eight frames total.

I actually even tried a second option which was to do ten frames (see below). I decided that I liked eight frames better.

The other bonus of using the masking tape method is that I know exactly where the frames will hang, so I wouldn’t need to make a ton of holes when hanging them.
To create my custom gallery wall, I worked with Frame It Easy. The custom photo-builder was very easy to use. I simply added in the photo size and matte size that I wanted and then made small adjustments to get them just right.
Here are the specs for my frames:
Art size: 10×10
Outside Frame Size: 27 3/16″ x 27 3/16″
Style: Ashford, in Satin Black
Matting: 8 1/2″ Smooth White (White Core)
Cover: Clear Acrylic
Backing: Acid Free Foamcore
ORDERING AND HANGING YOUR FRAMES
I ordered my frames from Frame It Easy and they were made within 3-5 business days and then sent to me. I printed out my own photos to put in the frames, but they have an option to include prints so you can receive your frames with prints already in them!
*Tip: When ordering your frames, choose a frame color that contrasts to your wall color. This will make it easier to see your frames and photos against your wall!
Once I received the frames, I got to work framing my photos.
They were nicely packaged. Here’s how each frame looked when I pulled it out of the package:

How to Hang Ashford Frame It Easy Frames
Note: Frame It Easy has video tutorials that you can check out too!
Step 1: Gather your materials.
The first step is to gather your materials.
I needed:
- wire cutters
- scissors
- tape
- flat head screw driver
- photos (I used 8, 12×12 photos in black and white)
- frames & additional components (from Frame It Easy) – this includes the frame, the acrylic cover, the matboard (if you order it), and the backing
- supply kit (from Frame It Easy) – this kit includes many of the items in the photo below: wire, spring clips, hook and nail for the wall, eurohangers, padding for each corner of your frame

Step 2: Disassemble the Frame
For the Ashford frames, which is the style I chose, I had to unscrew the farthest right screw and the farthest left screw on the bottom brackets.

Then I pulled the bottom frame piece off and slid out the backing, the matting, and the clear acrylic.

Step 3: Add the Photo
Set your backing and matboard aside and lay your acrylic cover down on your table. Peel off the protective film (you’ll notice both sides have the film). At this point, just peel off the one closest to you.

Next, lay your matboard on top the acrylic cover and then grab your photo and some tape.

Flip your photo over, line it up as best you can and then tape the corners to the matboard.

I flipped mine up just to ensure my photo was perfectly placed before proceeding.

Make any adjustments to your photo if it’s slanted in anyway.
Once done, add your backing and then flip all the contents so they face upward. Now, peel off the other protective film on the acrylic.

Step 4: Reassemble the frame
Take all your contents (the backing, matboard, photo, and acrylic cover) and slide them into the frame.

Screw your frame back together.

Push the spring clips under the frame so they push the photo forward and keep it tight.

Attach each eurohanger to each to each side of the frame. All you have to do is screw them in using your screwdriver. Try your best to make sure they’re at the same place on each side of the frame.

Next, tie the wire to each eurohanger and trim the excess with your wire cutters.

Step 5: Hang the frame(s)
Now your frames are ready to hang! Here are all my assembled frames.

Since I had already taped my walls, I knew exactly where the frames would go. I decided that I wanted to put the frames slightly lower than my tape marks so I proceeded with that in mind.
To get the location for where I would put the hanger, I measured from the top of my frames to my wire. Then, on the wall, I measured that distance from the tape line and made a pencil mark. Then I hammered the hanger in.

I proceeded using this measuring method for each frame.

I adjusted each frame as I went making sure they were perfectly placed on the wall. I had to adjust a couple of them and it was very simple to do. I just loosened the eurohangers and slide them a bit to the right spot and re-tightened them.

Here’s how they looked when I finished!

I am so happy with how these frames look on my large wall! They are the perfect finishing touch to my dining room.

Here are couple more view of these frames!


Special thanks for Frame It Easy for working with me on this project!


