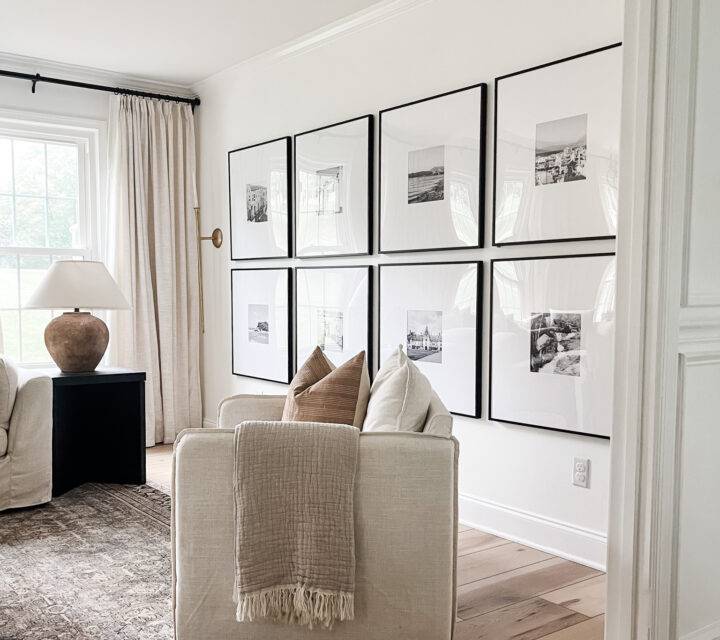
This trick to make an even gallery wall will make your life so much easier when you go to hang your photos. Actually, there are a few tricks in this tutorial and several pointers along the way so you can be sure that your gallery wall will be even and you won’t need to make a million holes in your wall to get it just right.
This tutorial will also save you your sanity! I know that it can be stressful getting a gallery wall just right – it doesn’t have to be hard; just use these tricks and tips to make a beautiful gallery wall the easy way!

This post contains affiliate links. For more information, see my disclosure.
Welcome to my new gallery wall y’all! I am tickled pink with how it turned out. Can I tell you…. I’ve struggled to find the perfect way to decorate this wall for so long. I’ve had so many different things on this wall over the years and I’ve never felt that it was quite right.
During this tutorial for hanging a gallery wall, you’ll see loads of holes in my wall, and now you’ll know why. I’m just keepin’ it real for ya!!
Fair warning: this post is pretty long and detailed. I wanted to make sure that I explain everything in detail so you know all the things and don’t have to stress when making your gallery wall.
Let’s start with the before of this wall. It’s just a plain old wall. One thing to note here is that my wall has chair rail, which means my gallery wall is going to ONLY be above the chair rail.
If you don’t have chair rail, your gallery wall should probably cover more of the wall, and go down lower, than mine.

HOW TO MAKE AN EVEN GALLERY WALL TUTORIAL
STEP 1: Gather your materials
To make an even gallery wall, you’ll need the following items:
- Hammer
- Nails
- Level (if desired)
- Tape measure
- Pencil
- Toothpaste
- Picture frames with your photos (These are the frames I have and I just printed black and white photos at CVS. I always use the CVS online photo service for printing 8×10 photos or smaller, and I’m able to pick them up in store a day later. I used 8×10 photos in these frames.)

I know what you’re thinking…toothpaste?! Yes, friend, go grab some toothpaste! THE TOOTHPASTE IS THE TRICK, and you’ll learn more about it later in the tutorial.

STEP 2: DO A MOCK OF WHAT YOU WANT YOUR GALLERY WALL TO LOOK LIKE
If you can imagine what you want your gallery wall to look like in your head and want to skip this step, that’s totally fine.
If you’re a visual person, however, and want to see what it will look like, do this step! You can lay out your picture frames right next to the wall so you can ensure that they’ll all fit on the wall.

STEP 3: FIND THE MIDDLE OF THE WALL
This step is probably the most important and you do not want to mess this up. If you don’t find the center of the wall, then your entire gallery wall will be OFF. If you’re not doing an entire wall and are doing part of wall, just measure to the middle of the area that you want to cover with your frames.
Once you measure the entire wall (or area where your frames will be), divide that number by 2 and you’ll know the center mark of the wall. I know this is obvious but one can never be too detailed.
Mark the center of your wall with your pencil. Remember, don’t mess this up, as it could throw off your whole gallery wall!
STEP 4: MARK THE WALL WHERE YOUR CLOSEST TWO FRAMES WILL GO
This step could be different for you depending on how many frames you have.
If you have an even number of frames across the wall, then follow this step.
If you have an odd number of frames across the wall, then you’ll simply place the middle of your frame on the middle point on the wall.
For me, since I had an even number of frames across the wall, I had to find the middle of the wall and then push each frame outward from the middle to make an even space.
I determined that I wanted 2.5” spacing between frames. So that’s what I worked off of.
Below are the first three points that I determined. You can see my light pencil marks on the wall. I found the center of the wall and then measured 1.25 inches either way from the middle point (I determined that each would go 1.25 inches in either direction to make up the 2.5 inch gap between my photos). The two outer points are where my frame edges will go.

STEP 5: DETERMINE DISTANCE YOU WANT PHOTOS FROM THE BOTTOM & DRAW MARKS
This step is important so that all your photos are perfectly in line. For me, this was super easy because I have chair rail, so I just measured up from the chair rail.
If you don’t have chair rail, just measure up from your floor and pick the distance you want the bottom of your photos to be at.
I determined that 8” above the chair rail is where I wanted the bottom edge of my photo frames. So, I measured and made a couple tiny marks with my pencil on the wall.

STEP 6: PUT TOOTHPASTE ON THE PHOTO HANGERS
This is THE TRICK (that I was referencing the name of this post) to making hanging your photos a cinch! Anytime I try hanging my photos a different way, I get soooo frustrated.
Seriously, toothpaste is your best friend when it comes to hanging photos. Don’t be lazy. Run to your bathroom and get some!
Make sure that when you put the toothpaste on your hangers, you put it on the very top of the hanger because that’s where the nail will go.

As you can see below, I’ve hung these frames before. I’ve got white and teal toothpaste on these frames, but no one will ever see it!

STEP 7: POSITION YOUR PHOTO & PRESS TO THE WALL
Now that you have your toothpaste on your photo hangers, be very careful and line up the bottom of the photo with your bottom pencil marks and the side of the photo with your side pencil marks.
Once you have it positioned correctly against the pencil marks you made in the previous steps, press the photo firmly into the wall and then gently pull it away.

One note here is that you want to make sure you don’t smudge the photo around because the toothpaste will then spread to multiple places. You have to be very careful when doing this step so that you know exactly where you need to put the nails in.
Below you can see the toothpaste marks it made when I pulled the photo away.

STEP 8: HAMMER IN YOUR NAILS INTO THE TOOTHPASTE MARKS
Now that you know exactly where your nails go, it’s time to nail ’em in!

This is what it should look like when you’re done.

You can wipe off the toothpaste at this point if you’d like!
STEP 9: HANG YOUR FIRST PHOTO
Woohoo! It’s time to hang your first photo. I know there were a lot of steps to get to this point, but you want to make sure your first photo is properly hung so it doesn’t throw off the rest of your gallery wall.
You can put a level on top your photo if you want just to make sure it is perfectly straight. If it just needs to move a smidge down on one side, I just hit the top of the frame VERY LIGHTLY so that it moves down.
If it needs a bit more adjusting, you can take the photo off the nails and hit the nails down or up to move them where you need it to be.
You shouldn’t need to adjust the nails too much though, That is the beauty of using this little trick.
STEP 10: HANG THE OTHER “CENTER” PHOTO
This step only applies if you have an even number of photos like me across your wall. If you have an odd number, that first photo would be your center photo.
Earlier, in step 4, I had made a pencil mark where my left center photo would go. So, at this point, I just had to repeat the process and measure 8” up from the chair rail.
Then, I put toothpaste on the photo holders, pressed the photo to the wall after I found the right spot, and then hung it up! Easy peasy!

STEP 11: HANG THE REST OF THE PHOTOS WORKING YOUR WAY OUTWARD
To make sure that all of your photos are placed properly, work from the middle outward. I completed the right side first, working from the middle right photo and then adding the next photo that was in line.
Don’t try to go out of order with your photos. Hang the photo that is directly beside the photo you just hung.
See here that I hung the next photo next to the current two photos I had, again measuring 2.5” from the frame and 8” from the chair rail.

Here’s how it looked when I completed the bottom row of photos!

STEP 12: HANG THE NEXT ROW
Now it’s time to hang the next row.
If you mis-measured slightly at all, no-one will ever know because you can align your top row directly with your bottom row.
For my photos, I continued with the 2.5” distance between photos and measured 2.5” above my first-row photos.
Instead of starting from the center this time, I worked from right to left. The reason I did this was because I wanted to make sure the wall distance on the end was the exact same for the top and bottom rows.
Then, I just continued with the rest of my top row, measuring 2.5” between frames.
It is super simple once you get in a groove! This gallery wall probably took me about 30-45 minutes to complete.
Below is the finished look!

TA-DA!!!

And here’s a look at the before and after:

This little gallery wall made such a big difference!
If you’re getting ready to make a gallery wall, my #1 pointer (outside of using toothpaste) is DON’T BE LAZY with it!! I know it’s easy just to grab nails and a hammer and guess, but you’re gallery wall will look terrible and off-centered if you guesstimate.
If you’re going to be see your wall often (which you probably will), you should make it look nice! So…don’t be lazy. Grab all the materials I outlined in this post and do it the right way the first time. Then, you won’t have to re-do it!
Have fun making your gallery wall!


